How to Read a Tape Measure

Joe is the creator of Inch Calculator and has over 20 years of experience in engineering and construction. He holds several degrees and certifications.

Ethan has a PhD in astrophysics and is currently a satellite imaging scientist. He specializes in math, science, and astrophysics.
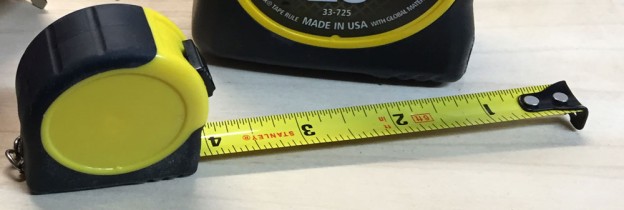
A tape measure, also called a measuring tape, is a roll of metal (sometimes cloth) tape with evenly graduated markings used for measuring the length of objects or spaces. The tape is often yellow and rolled in a plastic case.
Tape measures are commonly used in construction, architecture, building, home projects, crafts, and woodworking. They usually come in lengths from 6 feet to 35 feet long.
Tape measures may have measurements in imperial and metric, imperial-only, or metric-only.
How to Read an Imperial Tape Measure
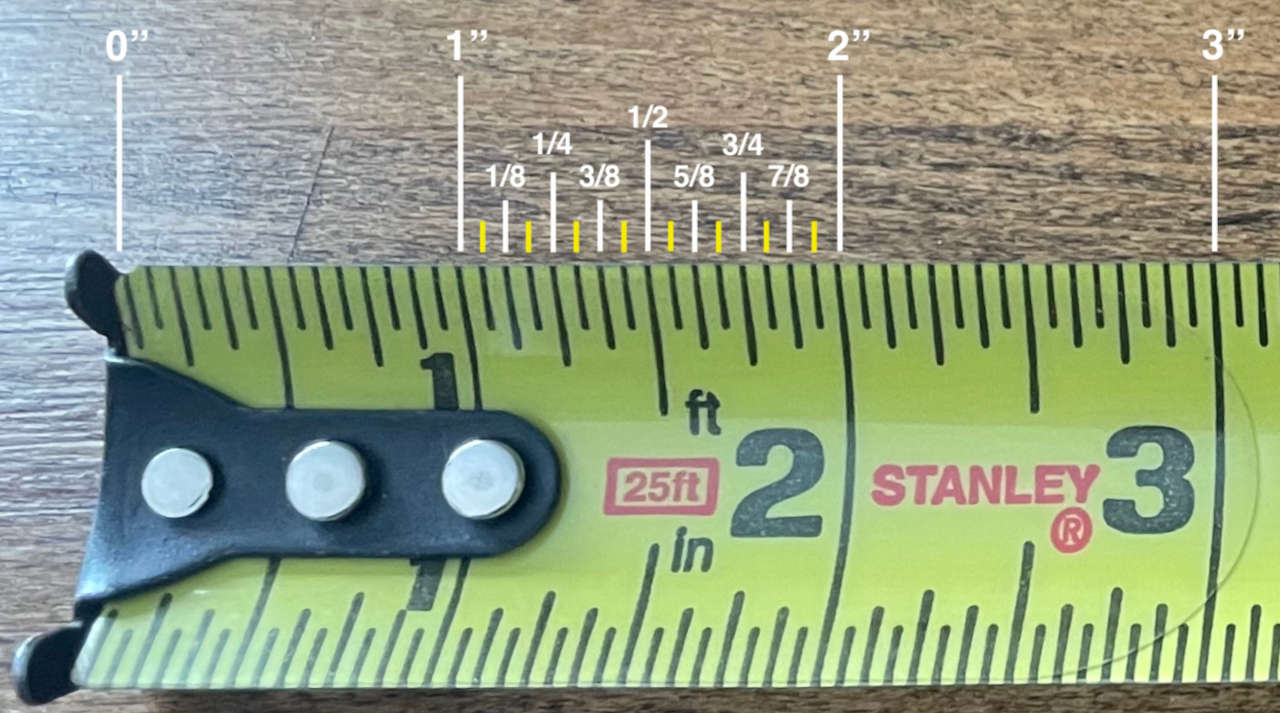
On an imperial tape measure, the markings represent lengths in inches and fractions of an inch.
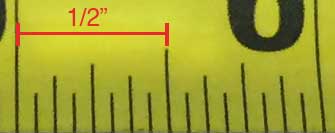
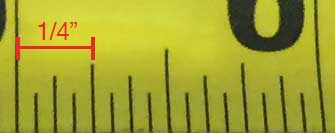
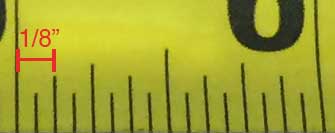
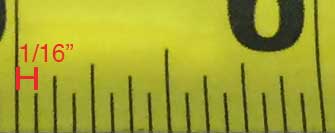
The largest ticks each represent one inch (1″) increments, and the smaller ticks between them represent the following fractions: 1⁄16“, 1⁄8“, 3⁄16“, 1⁄4“, 5⁄16“, 3⁄8“, 7⁄16“, 1⁄2“, 9⁄16“, 5⁄8“, 11⁄16“, 3⁄4“, 13⁄16“, 7⁄8“, and 15⁄16“. Therefore, the large ticks denote inches, and the smaller ticks denote fractions of an inch.
To read a tape measure, find the number next to the large tick, and then find how many small ticks past it the measurement is. Add the number next to the large tick with the fractional tick to get the measurement. For instance, if the length of an object measures five small ticks past the number 4 tick, then the measurement is 4 5⁄16“.
Reading a tape measure is the same as reading a ruler.
What Do All the Markings Mean?
Inch Fractions for Each Mark
See the table below for the decimal equivalents of all the fractions on a tape measure. You might also like our inch fraction calculator for converting between decimal and inch fractions as well as getting decimal equivalents for fractions.
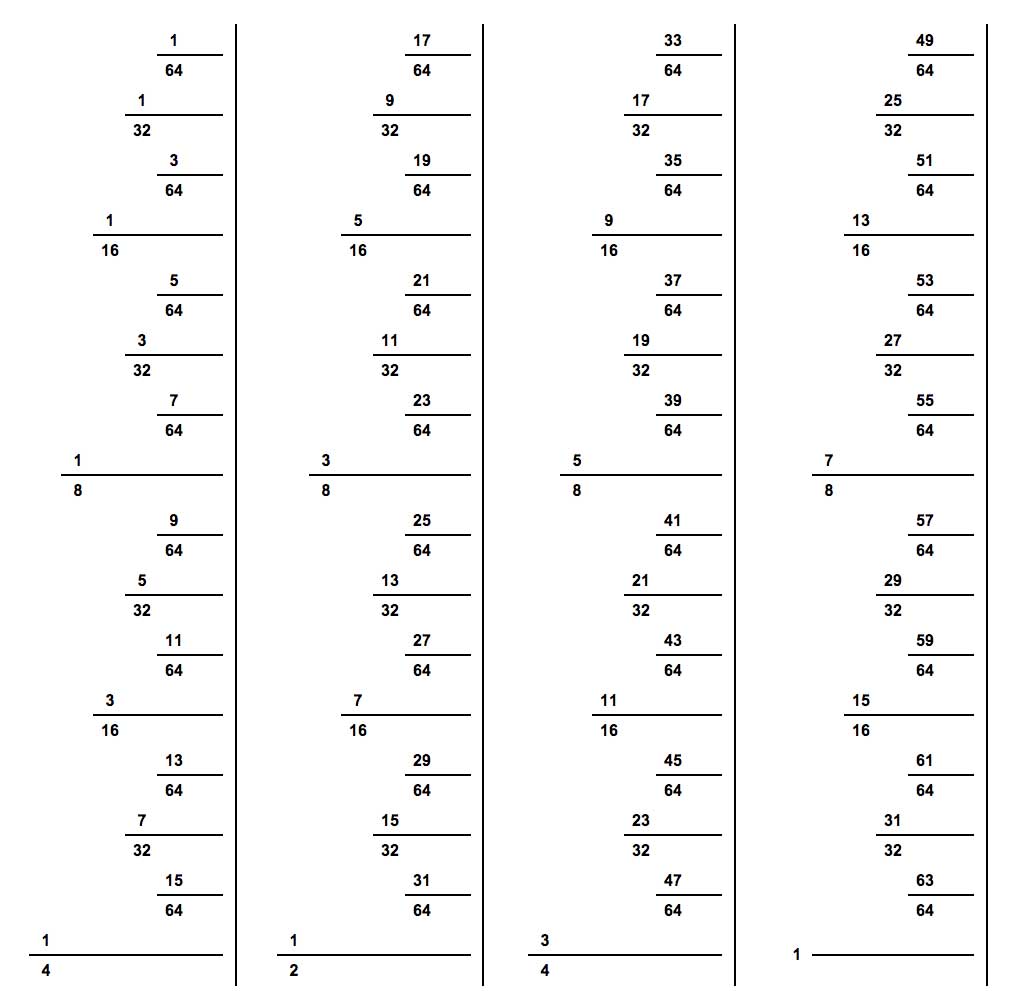
Inch Fraction, Decimal, and Millimeter Equivalents
| Fraction | Decimal | Millimeters |
|---|---|---|
| 1⁄16” | 0.0625 | 1.5875 |
| 1⁄8” | 0.125 | 3.175 |
| 3⁄16” | 0.1875 | 4.7625 |
| 1⁄4” | 0.25 | 6.35 |
| 5⁄16” | 0.3125 | 7.9375 |
| 3⁄8” | 0.375 | 9.525 |
| 7⁄16” | 0.4375 | 11.1125 |
| 1⁄2” | 0.5 | 12.7 |
| 9⁄16” | 0.5625 | 14.2875 |
| 5⁄8” | 0.625 | 15.875 |
| 11⁄16” | 0.6875 | 17.4625 |
| 3⁄4” | 0.75 | 19.05 |
| 13⁄16” | 0.8125 | 20.6375 |
| 7⁄8” | 0.875 | 22.225 |
| 15⁄16” | 0.9375 | 23.8125 |
| 1″ | 1 | 25.4 |
How to Read a Metric Tape Measure
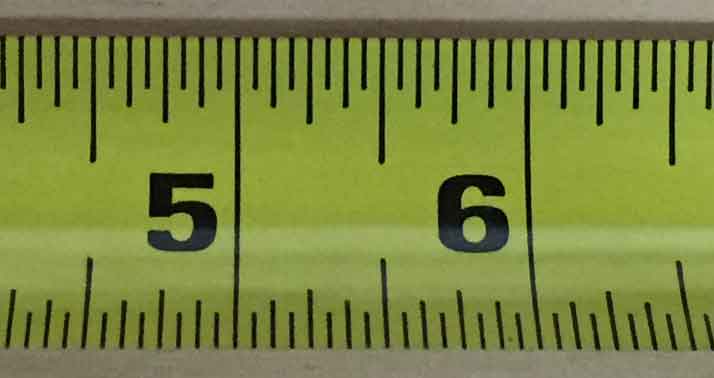
Metric tape measures have similar markings to imperial models, but the markings represent centimeters and millimeters instead of inches and fractions of an inch. The larger markings on a metric tape that are labeled with numbers are the centimeters, and the smaller marks are millimeters.
Because there are 10 millimeters in a centimeter, there are 9 millimeter tick marks between each centimeter on the tape.
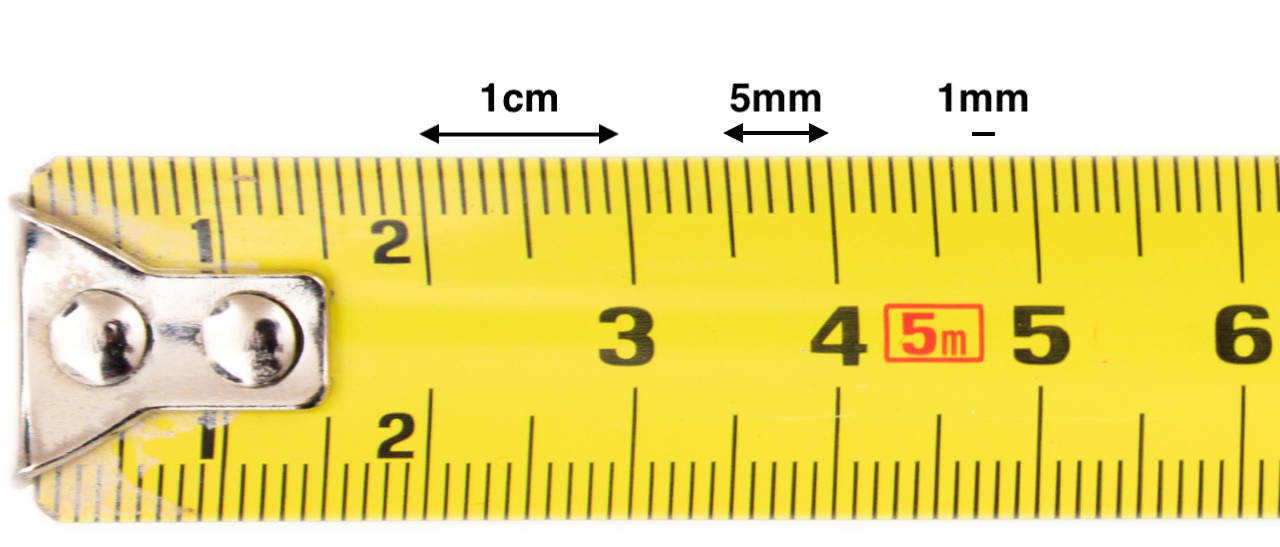
On a metric tape measure, there is 1 cm between each large numbered tick mark, and there is 1 mm between each smaller, non-numbered tick.
How to Use a Tape Measure
Get the most out of your measuring tape with the following tips for using it.
How to Use the Tape Lock
Almost all tape measures have a lock that will hold the tape measure in place and prevent it from recoiling. This is useful if you need to take tension off of the tape measure or if you need to set the tape measure aside while it is extended.
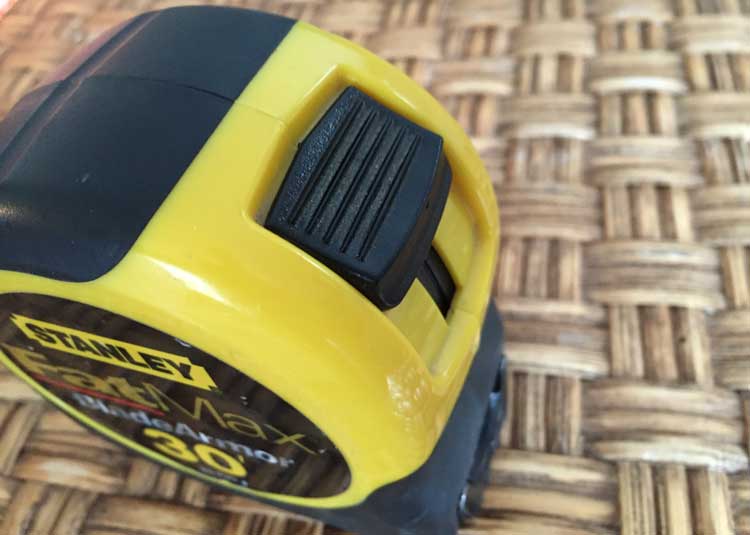
On this Stanley FatMax model, the slide lock is the large black button on the top. Sliding this down will lock the tape in place to prevent recoil.
As an Amazon Associate, we may earn commissions from qualifying purchases from Amazon. Learn more
How to Use the Sliding Hook
A signature feature of a tape measure is the hook on the end of the tape. This serves a dual purpose to:
- prevent the tape from rolling into the case
- allow the tape to be hooked onto the end of items for convenient measuring
You might notice that the end hook slides or moves just a bit. This is by design to account for the thickness of the hook, so when hooking to an object to be measured, the hook slides outward so that the end of the tape can sit flush with the end of the object.
When butting up against a surface instead, the hook slides slightly inward, so, once again, the end of the tape can sit flush with the surface. Both setups allow for better accuracy when performing various measurements.
Be mindful of tape measures that do not have a sliding hook, as they will not be as accurate.

How to Use the Framing Stud Hints
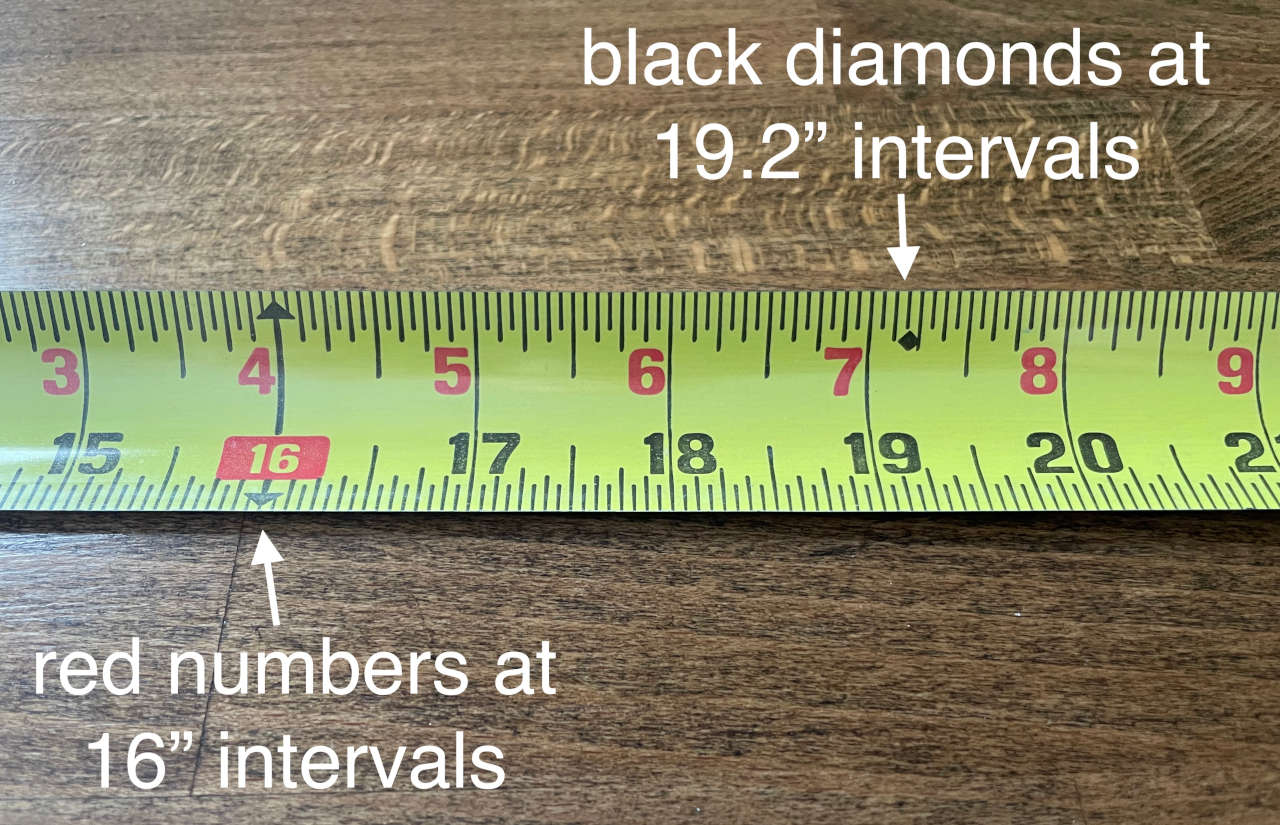
Most tape measures have red markings at certain intervals: 16″, 32″, 48″, 64″, and so on. These numbers are significant in that they indicate the placement of studs, which are usually spaced at 16 inches on center intervals, a property useful for framing.
Some tape measures also feature a black diamond symbol at intervals that are 19.2″ apart. These diamonds are also used to indicate joist spacing or framing intervals for a wider stud.
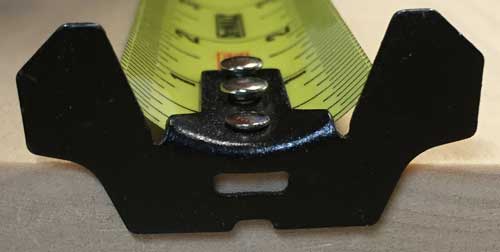
How to Use the Nail Grab
The hook on a tape measure often has a small hole or groove in it. This is actually used to allow attaching the hook on a nail or screw so it doesn’t slide off when making longer measurements.
This is especially useful for longer measurements, such as measuring across the length of a room or patio.
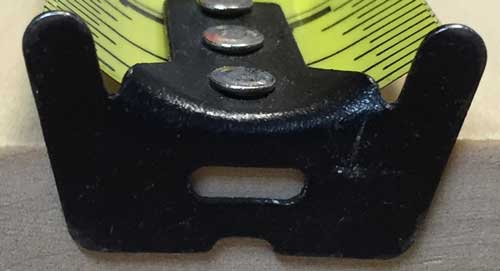
On the hook in the image above, the oval cutout is used to hook onto a nail or screw.
Use the Sides of the Hook
Some tape measures, especially framing tapes, have large hooks that can be used to grip surfaces on the side of the hook. Using these can improve the hook’s gripping ability, attach to a wider range of surfaces or edges, and improve the accuracy of measurements since the tape measure will not need to be twisted to read the markings.
How to Choose the Right Tape Measure
There are many tape measures on the market, and many serve very different purposes. When choosing the one that’s right for you, consider what you’ll be using it for, how long you need it to be, and how much you’d prefer to spend.
When choosing a tape measure, consider the following features to find a tape measure that’s right for you and your needs.
- Size and ease of reading the markings
- Imperial or metric markings
- Length of the tape
- Physical size of the tape and housing
- Standout length for measuring longer lengths
- Locking features
- Durability
- Price
In a pinch, you can print a tape measure to save a trip to the store.
Frequently Asked Questions
Is a tape measure in centimeters or inches?
An imperial tape measure has inch markings, while a metric tape measure has centimeter markings. However, you will sometimes encounter tape measures that have metric markings on one side and imperial markings on the other.
How do you read a tape measure in inches and feet?
When measuring the length of an object, extend the tape measure from one end of the object to the other. Where the tape measure meets the end of the object is where you will read the measurement. To read the length of the object in feet and inches, first, find the total number of whole feet that you can read on the extended tape.
Then find the total number of whole inches after the last whole foot. Finally, find the fraction of an inch from the last whole inch, and add all three measurements together (you can use our feet and inches calculator if needed). That will be the length of your object in feet and inches.
What can you use as a tape measure if you don’t have one?
If you don’t have a tape measure, you can instead use a ruler for shorter measurements, or if you know the length of a specific object, you may use that object. For example, if you have a standard piece of paper, you know it is 11 inches long.
Therefore, if the object you are trying to measure is equal to the length of two pieces of paper, then you know the object is 22 inches long.
Can you use your phone as a tape measure?
There are some apps out there that know the size of your phone screen and can thus display an image of a tape measure that maps to the correct tape measure sizing. There are also some devices that are equipped with better sensors to facilitate measuring the length of distance to objects.
However, be cautious with these as the measurements are not necessarily as accurate as a physical tape measure.
How accurate is a tape measure?
Tape measures are accurate to their smallest tick. For example, if the smallest tick on your tape measure is 1/16th of an inch, then that tape measure is only accurate down to 1/16th of an inch.