Wainscoting Layout Calculator
Provide the number of panels you want and we'll calculate how wide the panels should be so they can be evenly spaced on the wall and we'll layout the stiles for the calculated panel dimensions.
Provide an approximate width of a panel and we'll calculate the closest exact panel size that can be evenly spaced on the wall and we'll layout the stiles for the calculated wainscoting panel dimensions.
Layout Using Number of Panels:
Dimensions
| Panel Width: | |
| Stile Width: |
Layout Drawing
Stile Locations
Dimensions
| Panel Width: | |
| Stile Width: |
Layout Drawing
Stile Locations
On this page:
- Calculator
- How to Lay Out Wainscoting
- Step One: Measure Each Wall
- Step Two: Decide The Number of Panels on Each Wall
- Step Three: Determine the Rail and Stile Width
- Step Four: Calculate the Panel Width
- Step Five: Determine Stile Length
- Step Six: Lay Out the Panels and Stiles
- How to Estimate Wainscoting Materials
- Estimate the Amount of Wainscoting Stile Material Needed
- Estimate the Amount of Wainscoting Panel Material Needed
- Handling Inner Corners
- Additional Carpentry Resources
- Frequently Asked Questions

Joe is the creator of Inch Calculator and has over 20 years of experience in engineering and construction. He holds several degrees and certifications.

Sarabeth is an expert in the home and garden industry and was formerly a certified kitchen and bathroom designer. She is a subject matter expert in home improvement and is often quoted in notable publications.
How to Lay Out Wainscoting
Wainscoting is a system of panels, rails, and moldings that add decoration and protection to the walls of your home. Wainscoting may be installed to waist or shoulder height and is available in many materials and styles.
The most common types of wainscoting include raised panel, flat panel, overlay panel, board and batten, and beadboard.
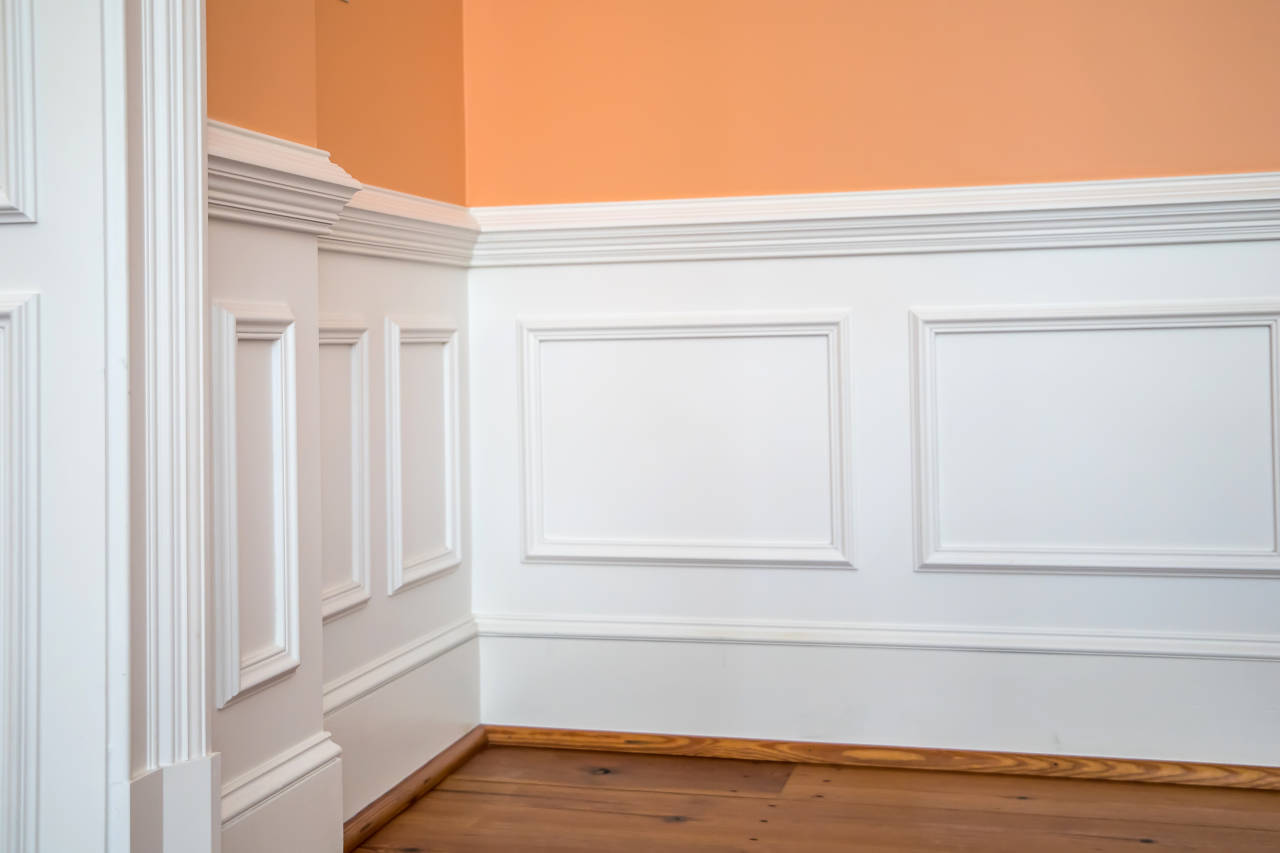
Let’s talk a bit about terminology for the parts that make up wainscoting. The horizontal boards at the top and bottom of the paneling are called rails, and the vertical boards that separate the panels are called stiles.
The larger boards in the middle of the rails and stiles are called panels. Panels may be installed with trim between the rails and stiles, but a flat panel or board and batten look can be achieved without installing a wood panel.
Depending on how ornate you want the installation to be, you can also use additional moldings above the panel molding rails and below the chair rail. These are often called apron moldings, but you can use a variety of styles, including pencil, dental, and screw.
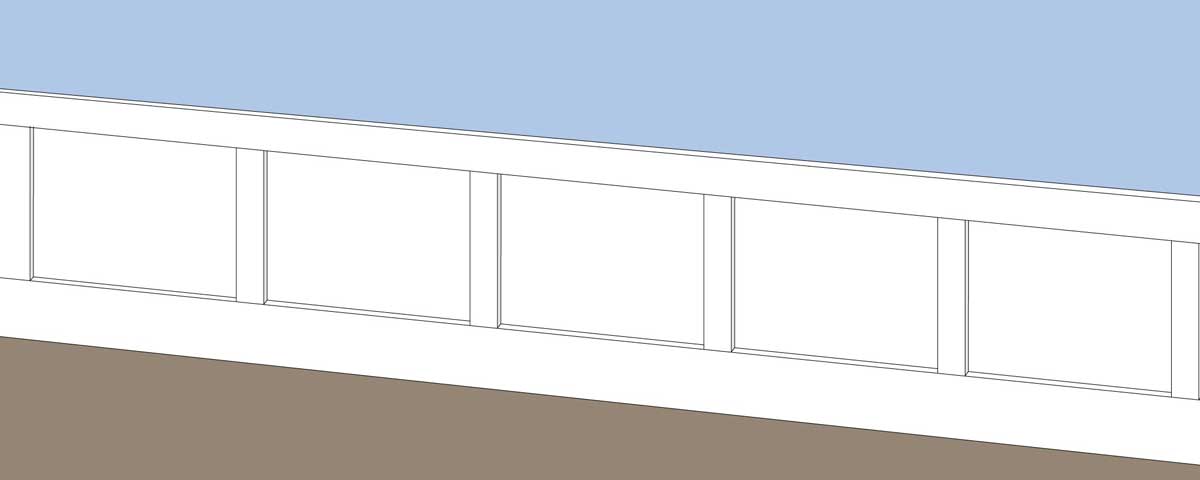
Before starting a wainscoting installation, it is critical to lay out the rails, stiles, and panels. Most often, the panels are an even width, which requires some measuring to find the correct width that allows all of the panels to be consistent.
Step One: Measure Each Wall
To start laying out the panels and stiles, measure the width of each wall in inches. If measurements are in another form, such as feet, convert the measurement to inches.
Step Two: Decide The Number of Panels on Each Wall
Once you have the width of each wall, consider how many panels you would like to install on each of them.
If you are using readymade panels, or installing a click-lock beadboard, get the measurements of each panel or piece. Most panels come in sections that are either 48″ or up to 96″ in width. If you are making your own wainscot out of various pieces, you can determine the size of each panel.
To get an idea, lay out the various components on the floor in front of the wall. You can play with the width of the stiles on the panels to determine the total number of panels there will be, then measure for the final width. Depending on how you lay it out and the type and style of wainscoting, you may measure the width of the flat section inside the moldings, or you may measure the entire section from stile to stile.
You can find out how many panels you need by dividing the width of each wall by the rough panel size. You’ll probably end up with an odd number, like 3.4 panels, and that’s ok; just round to the closest whole number.
Step Three: Determine the Rail and Stile Width
If you are making your own wainscoting and you are using a flat panel style, you will need to determine the width of the rails and stiles that will surround each indented panel. These are flat pieces of lumber, but you may choose to add additional moldings inside of panels as well.
However, the rail and stile widths will influence the size of the flat panel inside of them. The larger the rail and stile, the smaller the panel.
The top rail and stiles are usually 2″-3″. The lower rail is often much wider than the top rail, usually around 7″-8″.
Step Four: Calculate the Panel Width
The next step is to find the exact width of the panels for each wall. It’s likely that the panel size will vary from wall to wall slightly, but the goal is to get them close to the same size or to a size that looks good visually.
One formula to find the panel width is to divide the wall width plus the stile width by the number of installed panels to find the width of the stile and panel together, then subtract the width of the stile to find the final width of the panel.
panel width = (wall width + stile width / number of panels) – stile width
Keep in mind that this will be the visible width of the panel, or more specifically, the distance between each stile. For panel designs that incorporate trim between the panel and the stile, the actual panel size may be smaller, and for assembled panels where the panel is installed in a groove behind the stiles, the panel may be larger.
The exact style of wainscoting will inform the actual panel width, but at this point, it’s possible to start laying out the stiles evenly on the wall.
Step Five: Determine Stile Length
To find the length of the stiles, start by determining the desired height of the wainscoting, then subtract the top rail and bottom rail width from the overall height.
stile length = wainscoting height – top rail width – bottom rail width
Step Six: Lay Out the Panels and Stiles
To start laying out the stiles, locate the first stile, which would be from 0″ to the stile width. Then add the width of the panel to find the next stile location. Continue this process along the wall to locate the placement of each stile.
If you are using panel sections that have three or four raised panel designs in them, you will need to make sure that the panels are even on the wall. Otherwise, unless your wall length is evenly divided by the panel section length, you may end up with an uneven end.
For a layout where the ends will use panels that are smaller than the rest of the wall, it’s best to start in the center of the wall and go evenly out to each side. Cut the end panels as needed; they will be even on either side for a balanced layout.
At this point, the layout is complete; the design of each wainscoting style may change the actual size of the components that need to be cut to assemble the paneling, so refer to the designs for the wainscoting you’re using to determine the final dimensions for each part.
How to Estimate Wainscoting Materials
There are a few components that need to be estimated to find the amount of material needed. Start by measuring the wall width and wainscoting height. The width of the wall will be the needed length of the top rail, bottom rail, and chair rail or cap molding.
Estimate the Amount of Wainscoting Stile Material Needed
To find the length of stile material needed, find the height of each stile and multiply by the number of panels, then add 1. For example, if a stile is 24″ and there are three panels, there will be 96″ of stile material needed.
stile length = stile height × (number of panels + 1)
Estimate the Amount of Wainscoting Panel Material Needed
To find the amount of panel material needed, multiply the height of the panel by the width of the panel to find the size of the panel, then multiply by the number of panels needed. For example, a 24″ high by 36″ wide panel is 6 square feet; if there are three panels, then 18 square feet will be needed.
panel material square footage = panel height × panel width × number of panels
You can also use a square footage calculator to find this.
Handling Inner Corners
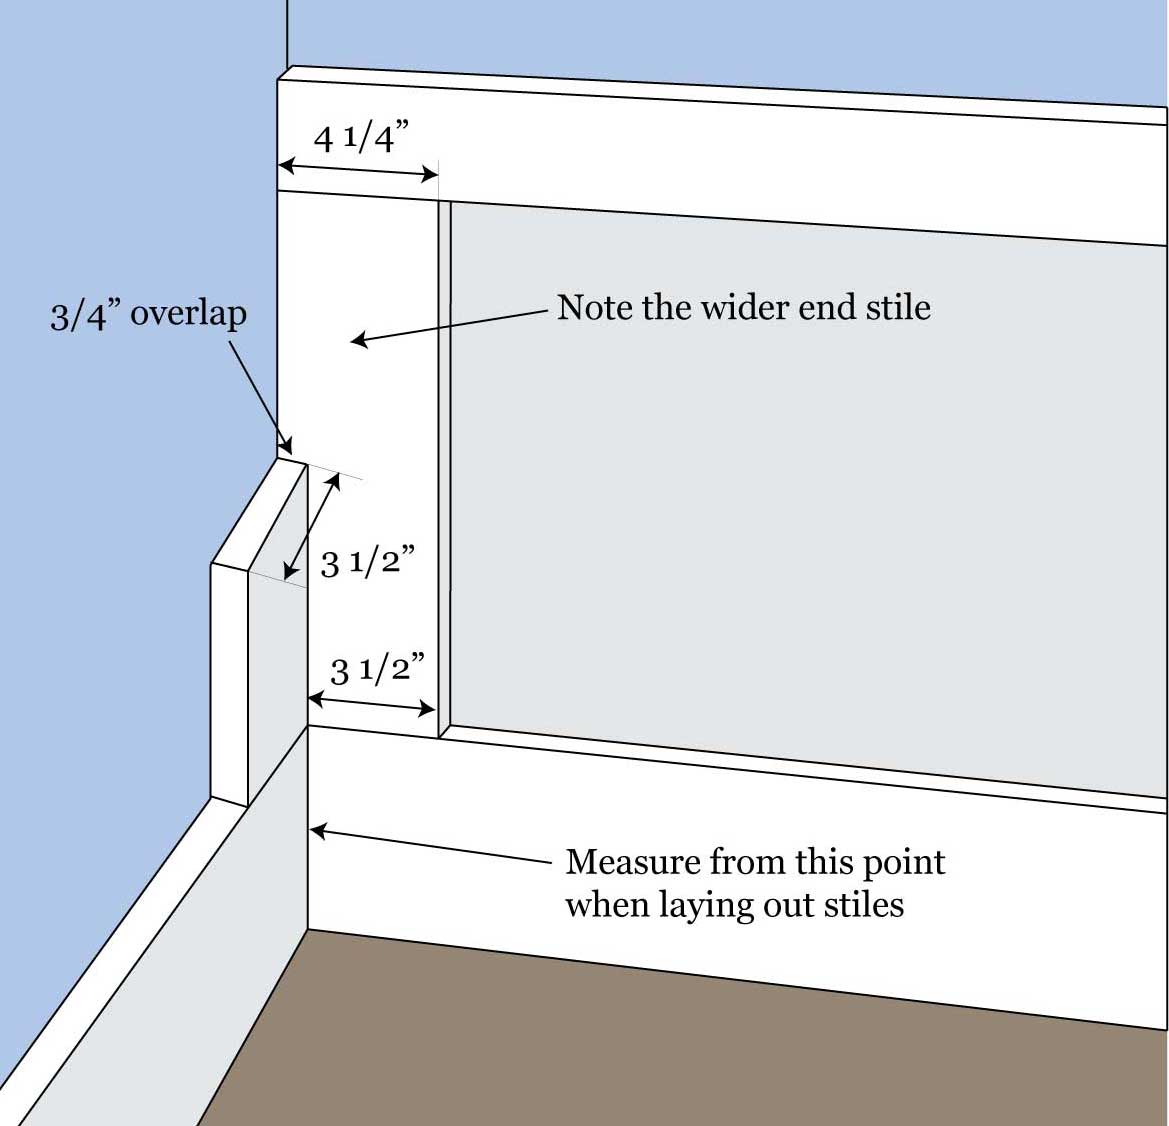
It is almost inevitable that a wainscoting project will involve an inner corner. The inner corner adds a slight challenge because there is an overlap of the wainscoting where the walls meet.
This can cause the stile on one edge to appear thinner than the rest since a portion of the stile is buried behind the wainscoting on the adjacent wall. To account for this, use a stile on each edge that is wider by the thickness of the stiles.
Alternatively, you can miter the corners of each style. This allows them to fit together in the corner without subtracting any thickness.
To get an even panel layout, subtract the thickness of the added stile widths from the wall width before calculating. The provided stile locations may be off if the first stile is wider; consider this when laying out the stiles.
It may be necessary to add the extra stile thickness to each still start and end location to make the layout even.
Additional Carpentry Resources
Use our trim and molding calculator to estimate the linear footage of trim and moldings for a room. Our board footage calculator is great for estimating the board footage of a board, which is necessary to calculate the cost of materials. Get free wainscoting installation estimates from professional trim carpenters in your area.
Frequently Asked Questions
How far apart should wainscoting be?
This will vary depending on the style. Panel interior size can range from 12″ to 36″, but wainscoting comes in many styles, including some with much tighter spacing.
How tall should wainscoting be?
The most basic rule of thumb is that wainscoting can be waist or shoulder height. However, you can purchase readymade panels that are 32″ to 48″ and combine them with baseboard and cap moldings to increase the height more to achieve the style you’re looking for.
Do you use baseboard with wainscoting?
It isn’t necessary, but in most cases, it is used. The baseboard can take the place of the bottom rail, or it can be used below it for added height and wall protection.
Should you roll or brush to paint wainscoting?
This can vary depending on the material it’s made from. MDF takes paint very smoothly regardless of application, while some wood moldings may need a brush to get into the various pieces.